Unfortunately the weather until this week hasn't been good for night viewing, mostly overcast or rain. However the past to nights have been clear and frosty, so I decided to setup the HS20 piggybacked on my 4 inch short focal length Refractor.
Rather than use a dedicated mount with slow motion drives I used it on my "Grab & Go" mount as the maximum exposure time would be 15 seconds at most. This would produce a reasonable image with only a tiny amount of star-trailing. As it turned out the wind, although only a very light breeze caused more elongation in the images than the exposure time.
 |
| The business end. HS20 mounted on 105mm Skywatcher Refractor. |
Next on the list was a couple of shots about 30 minutes after dark, looking at a bright star and testing focus method. It turned out that the most reliable focusing was achieved by having focus set in "Tracking Mode".
The camera setup that was used for every shot from then on was as follows.

- Focus: Tracking Mode
- Mode setting: Manual mode
- White balance: Shade
- LCD Brightness: -5
- ISO: 200 & 400
- Shutter speeds used: 15, 13 & 8 second exposures
- Display information: Off ( once setup confirmed).
- Shutter release: 2 second timer.
- Focal lengths used : 30 to 80mm equivalent (DSLR)
- AE Metering: Average
- Image Stabilisation: Off
A larger version of each image is available for view or download from here: Southernshooter
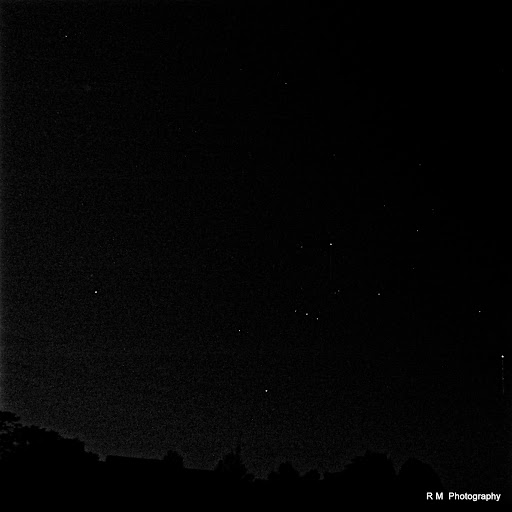
Now that everything was setup it was just a matter of selecting the region of interest, and as its winter here in the early evening, Scorpio is nicely placed in the eastern sky and directly overhead is the Southern Cross. Both these areas contain massively rich star fields and would provide some nice bright stars on a starry background. I was interested to see how the new sensor would perform, and I have to say that astonishing is perhaps the best way to describe it.
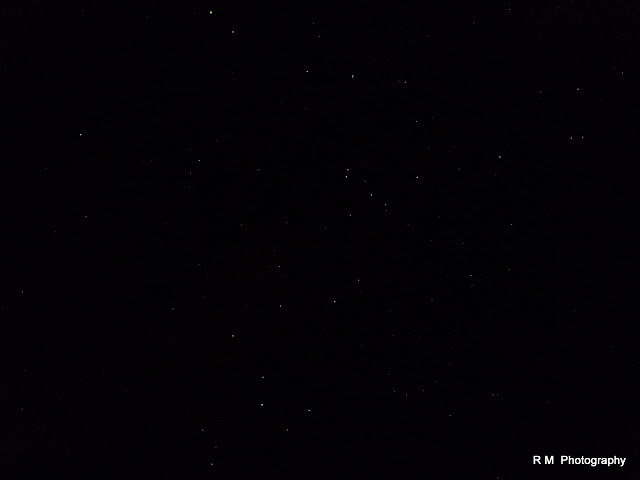 |
| Sagittarius & Scorpio Single frame unprocessed |
This sensor is so much quieter than any other Fuji that I have used for this type of exercise, and easily rivals shooting with my 35mm Slr's. If I could find a way of attaching it to the telescope for prime focus photography, I think it would be a winner.
The amount of detail in one
frame when processed through Registax 6 is remarkable.
The amount of detail in one
frame when processed through Registax 6 is remarkable.
The finished frames seen here are two stacks of two images (4 in total) stacked and processed using Registax 6.
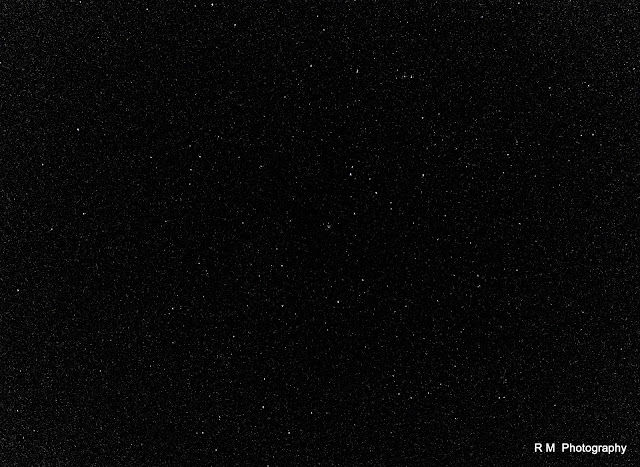 |
| Processed image 4 x stack of Sagittarius & Scorpio |
I have included a before and after photo of each. Even the before photos weren't all that bad. Also included is a single shot taken with the HS10 and shot in Black and White. Sensor noise is easily evident in this image when processed in Registax 6
As these images were shot in the southern hemisphere our northern readers will need to flip the images. In the two images above, Scorpio is at the top of the frame & Sagittarius at the bottom. The large open star cluster M6 can be seen at center of the image.
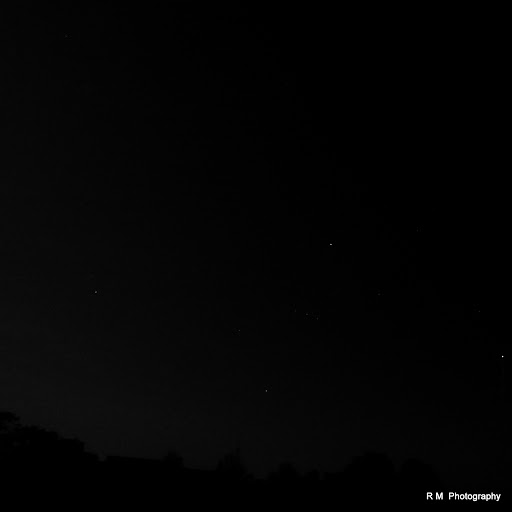
 |
| The Southern Cross is easily seen here lying on its side, with Acrux, the brightest star in the constellation at center of image. |
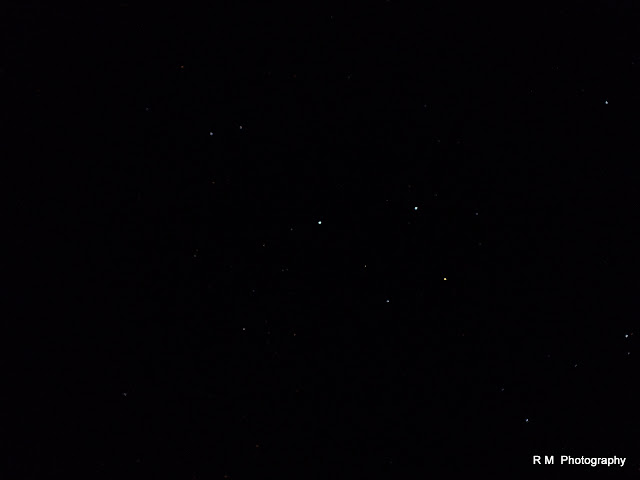
 |
| Processed image of the Southern Cross Starfield. |
The second of the two Southern Cross images gives some indication of the amount of stars in this region. When photographed with large telescopes, the amount of visible stars is truly staggering. The final two images were taken with the HS10 last summer, the first is the original and the second was put through processing in Registax (a mild treatment) and is shot in Black & White. Shot at ISO 800 and showing considerable noise even after processing. This gives some idea of just how much better the HS20's sensor really is. I wonder what a 2/3 sensor would be like in this EXR mode? One can only speculate.
 |
| Unprocessed B & W image from the HS10 of the constellation Orion. |
 |
| Single processed frame of the constellation Orion. Processed with Registax 6 |
Could you please photograph the star cluster Europeans call "The Pleiades" for me. Thanks.
ReplyDeleteHi. Can you make a comparison between Hs20 and HX100V. I like bird photo, so i need manual focus and manual zoom. Which is better (zoom, focus, photo quality, focus, timings etc). I had hx1. It was great except manual focus and zoom.
ReplyDeleteThanks a lot for the reviews.
I haven't had the chance to get hold of the Hx100v. Sony dont seemed to have released it in any major quantity here in New Zealand as yet.
ReplyDeleteI have been monitoring the cameras progress at Dpreview's Sony Talk Forum.The camera does have a manual zoom option, but I prefer the full barrel manual zoom as with the HS20. The Sony cam seems to perform quite well at web and small print size, but a number of reports have started to come out that suggest it isn't all the good detail wise when viewed at higher resolutions.
If you can get one to use for a day or two that would be the best way to compare the cameras. Personally for me I see no need to change from the Fuji cameras at present.
Hi Ralph, this is something i'm interested in too but have a couple of questions. With my HS20, should i put the eyepiece on the telescope and focus through that, or put the HS20 directly on the hole where the eyepiece would be, as i'm not sure which is best?
ReplyDeleteSecondly, do you need to stack images or can you do longer exposures and avoid stacking, i'm not sure how that works!
Also, i've just done my first (short) timelapse sequence today with my HS20 coupled to a JJC TM-K intervalometer. I got it off ebay, and it's only about 6 pounds more than the standard fuji remote release, so well worth the money.
So would the intervalometer also be usefuul for the astrophotography, or does it just smear images with too much of a delay? I mean how long can you stretch exposures without star trails?
Pretty as they are, i also want some crisp clean shots.
Oh, and if you're interested, here is a link to my first timelapse video;
https://picasaweb.google.com/MitchyK7/Videos02?authkey=Gv1sRgCPLciM3v14fuDw#5626223317181653026
Thanks for all the work with this camera, it's really helping to discover it's abilities, and improve my own. :)
Hi Mitchy,
ReplyDeletewithout a tracking mount like I use maximum exposure time is about 15 to 20 seconds. Any more and you will start to get elongated stars and if you are stacking them it can make it worse.
I had my camera set at 80mm focal length for the Southern Cross and 50mm for Scorpio as it covers a larger area of sky. At 24mm wide angle you could probably push the exposure up to around the 25 second mark.
The remote release is handy if you want to use bulb mode to keep the shutter open longer but you would very definitively get star trails after about 30 seconds.
I'm a member of the CloudyNights forums as well and this would be a good place for you to visit. Follow this link http://www.cloudynights.com/ubbthreads/postlist.php/Cat/0/Board/low
Good luck, it requires large quantities of patience but is also a lot of fun when it works out right.
Something I forgot to mention. Keep the eyepiece in, set camera to macro and check focus on the LCD, by focusing the telescope first then after you have good focus in the telescope refocus with the camera in place. Its a little tricky but some experimenting will soon have you up and running.
ReplyDeleteHey guys Im quite new to cameras and I'm just getting into time lapsing and intervalometers. I was wondering if you could gI've me some advice on what a good intervalometer is that I could use on the fujifilm hs20?
ReplyDeleteAs you dont say what camera you are using its a little difficult to tell.
ReplyDeleteIf you have the Fuji HS10 you can use the countdown timer on-board as this camera shoots at 1000 fps.
The same holds true for the HS20 but only up to 320fps. There is a possibility that the HS20 could be coupled with an external timer but to date I haven't heard of one.Someone inquired a while back at Dpreview about the same thing so it might be worth doing a search of the forums there for a better answer.
To date I,m not aware of anyone using an intervalometer with any Fuji camera. Sorry I cant be of more help.
Cjeers
Ralph
Thankyou, but at the end I said I had the hs20 haha but thanks
ReplyDeleteHah you are quite right.
ReplyDeleteSkipped that last bit. See what happens when you type while eating breakfast :)
hi Ralph
ReplyDeleteDoes the hs20 have some sort of facility to do multiple shots "on the same frame". I am trying to catch a sequence of an eclipse of the moon where there are perhaps 10 images of the moon on one picture as it moves across the sky.
This was possible on my old film camera.
It seems that i might need to combine multiple pics into one picture.
in your article above did you have to manually trigger the camera each time
Regards
Stefan
Hi Stefan
ReplyDeleteYes each of the above images is a stack of four or more. The HS10 used to allow you to do several frames in the one image but they took this feature out in the HS20.And yes that required manually triggering the shot. I use the 2sec countdown to do that.
Cheers
Ralph